내 서버에 Https 적용하기 (with Nginx)

내 서버에 Https 적용하기 (with Nginx)

무료 HTTPS 인증서 발급 기관인 Let’s Encrypt를 통해 내 서버에 Https를 적용하는 법을 알아보겠습니다.

인증서를 얻기 위해서는 해당 서버에 SSH로 접속해야 합니다.

1. Certbot 설치

Certbot은 Let’s Encrypt의 인증서 발급을 편하게 도와주는 도구 입니다. Certbot을 설치하기 위해서는 다음과 같은 명령어를 입력해 주시길 바랍니다.

1
2
3
4
5
6
$ sudo apt-get update
$ sudo apt-get install software-properties-common
$ sudo add-apt-repository universe
$ sudo add-apt-repository ppa:certbot/certbot
$ sudo apt-get update
$ sudo apt-get install certbot

2. 인증서 발급

인증서 발급은 인증 기관(여기서는 Let’s Encrypt)이 인증서 발급을 요청한 서버가 실제로 이 도메인을 소유하고 있는 지를 검증하기 위해 요청 도메인의 특정 Path에 특정 내용을 담아보라고 요구합니다.

예를 들어 hyunsub.kim에 대한 인증서를 요청하면 인증 기관은 http://hyunsub.kim/1q2w3e4r에 ‘asdfqwer’를 담아보라고 요구하고 이 것을 수행하면 이 도메인을 소유하고 있다고 판단하는 것입니다.

따라서 certbot이 이러한 작업을 할 수 있도록 명령어를 입력하는데 크게 2가지 경우가 있습니다.

1) 80 포트에 돌아가는 웹 서버를 잠시 정지 시킬 수 있는 경우

1
$ sudo certbot certonly -d www.example.com --standalone

certbot이 독자적인 웹 서버를 80 포트에 돌려서 위의 인증 기관의 요구 사항을 수행합니다.

2) 80 포트에 돌아가는 웹 서버를 잠시 정지 시킬 수 없는 경우 (webroot)

1
$ sudo certbot certonly -d www.example.com --webroot -w /var/www/example

만약에 80 포트에 돌아가는 웹 서버를 정지할 수 없는 경우 webroot 폴더 경로를 지정해 주면서 인증 기관의 요구 사항을 수행합니다.

여기서 w 옵션의 값으로 들어간 /var/www/example 폴더가 webroot 폴더인데 예를 들어 /var/www/example/tmp.txt 에 파일을 생성하면 http://www.example.com/tmp.txt 로 접근할 수 있게 웹 서버 설정이 된 폴더를 webroot 폴더라고 합니다.

3) 80 포트에 돌아가는 웹 서버를 잠시 정지 시킬 수 없는 경우 (Manual)

1
$ sudo certboy certonly -d www.example.com --manual

아래 nginx 설정처럼 webroot 폴더가 없는 경우 이 방법을 사용하면 됩니다. 아래와 같이 nginx 설정을 통해 인증 기관의 요구 사항을 수행합니다.

1
2
3
4
5
6
7
8
9
10
11
12
server {
listen 80 default;
server_name home.hyunsub.kim;

location /.well-known/acme-challenge/D-Vxj9IdTZH1olzPp6ignQFn14GxE3YlzB0cYA6mAEk {
return 200 "D-Vxj9IdTZH1olzPp6ignQFn14GxE3YlzB0cYA6mAEk.ZlPIVlhU8ETlWqd4WS3pR7AHmjQaL_HoPLgvdyIBf0c";
}

location / {
return 301 https://home.hyunsub.kim$request_uri;
}
}

위 3가지 방법 중에 하나를 수행하고 나면 아래의 경로에 두 파일이 만들어집니다.

  • /etc/letsencrypt/live/{도메인 주소}/fullchain.pem (인증서 + 공개키 파일)
  • /etc/letsencrypt/live/{도메인 주소}/privkey.pem (개인키 파일)

이제 이 두 파일을 Nginx에 적용시켜 보겠습니다.

3. Nginx 설정

1
2
3
4
5
6
7
8
9
10
11
12
13
14
15
16
17
18
19
20
21
22
server {
listen 80 default;
server_name home.hyunsub.kim;

location / {
return 301 https://home.hyunsub.kim$request_uri;
}
}

server {
listen 443 ssl default;
server_name home.hyunsub.kim;

ssl_certificate /etc/letsencrypt/live/home.hyunsub.kim/fullchain.pem;
ssl_certificate_key /etc/letsencrypt/live/home.hyunsub.kim/privkey.pem;

location / {
root /usr/share/nginx/html;
index index.html;
try_files $uri $uri/ /index.html;
}
}

4. 인증서 갱신

Let’s Encrypt 인증서는 3개월 후에 만료되므로 주기적으로 갱신시켜주어야 합니다.

인증서 갱신은 인증서 발급과 같은 과정을 거치기 때문에 80 포트를 쓸 수 있냐 없냐로 나뉘어서 명령어를 입력해야 합니다.

1) 80 포트에 돌아가는 웹 서버를 잠시 정지 시킬 수 있는 경우

1
2
$ sudo certbot renew --pre-hook "service nginx stop" --post-hook "service nginx start"
$ sudo certbot renew --pre-hook "service nginx stop" --post-hook "service nginx start" --dry-run # 갱신 테스트

prehook, posthook을 통해 갱신 전에 웹 서버를 잠시 정지시키고 인증서 갱신한 다음 다시 웹 서버를 실행시킵니다.

2) 80 포트에 돌아가는 웹 서버를 잠시 정지 시킬 수 없는 경우

인증서를 발급 받을 때와 같은 명령어를 입력하면 됩니다.

5. Crontab에 등록

Crontab에 다음과 같이 추가해서 주기적으로 인증서 갱신을 하도록 합니다.

1
0 0 1 * * sudo certbot renew ...

매달 1일 0시에 인증서를 갱신한다는 의미입니다.

하지만 인증서 갱신은 인증서 만료 30일 전부터 가능한다는 점 알아두셔야 합니다.

6. 내 사이트 테스트

아래 사이트를 통해 내 사이트의 HTTPS를 검증할 수 있습니다.

https://www.ssllabs.com/ssltest/

7. [부록] 와일드카드 인증서

와일드카드 인증서에 대한 설명은 생략하도록 하겠습니다.

1
$ sudo certbot certonly --manual -d '*.hyunsub.kim' -d hyunsub.kim --preferred-challenges dns

먼저 위 명령어를 입력합니다. 실수로 -d 옵션을 두 개 입력한 것이 아닙니다. 하나는 와일드카드 인증서, 나머지 하나는 hyunsub.kim에 대한 인증서 입니다. 이 두 개는 다른 것이기 때문에 두 개를 꼭 명시해주어야 합니다.

1
2
3
4
5
6
7
8
9
10
11
12
13
14
15
Saving debug log to /var/log/letsencrypt/letsencrypt.log
Plugins selected: Authenticator manual, Installer None
Obtaining a new certificate
Performing the following challenges:
dns-01 challenge for hyunsub.kim

- - - - - - - - - - - - - - - - - - - - - - - - - - - - - - - - - - - - - - - -
NOTE: The IP of this machine will be publicly logged as having requested this
certificate. If you're running certbot in manual mode on a machine that is not
your server, please ensure you're okay with that.

Are you OK with your IP being logged?
- - - - - - - - - - - - - - - - - - - - - - - - - - - - - - - - - - - - - - - -
(Y)es/(N)o:

그러면 위와 같은 메시지가 나오는데 Let’sEncrypt 쪽에서 인증서 발급 요청을 하는 아이피를 로깅해도 되겠냐고 물어봅니다. 거절하면 중단되기 때문에 Y를 입력하고 엔터를 누릅니다.

1
2
3
4
5
6
7
8
9
- - - - - - - - - - - - - - - - - - - - - - - - - - - - - - - - - - - - - - - -
Please deploy a DNS TXT record under the name
_acme-challenge.hyunsub.kim with the following value:

CMvPkXSCJK6eMu2oaPtEa2vNEO6SJ_fPtqDU4ZXwhzM

Before continuing, verify the record is deployed.
- - - - - - - - - - - - - - - - - - - - - - - - - - - - - - - - - - - - - - - -
Press Enter to Continue

위와 같은 메시지가 나올텐데 엔터를 한 번 누릅니다.

1
2
3
4
5
6
7
8
9
- - - - - - - - - - - - - - - - - - - - - - - - - - - - - - - - - - - - - - - -
Please deploy a DNS TXT record under the name
_acme-challenge.hyunsub.kim with the following value:

YyOb_PjJYJ_JIR-EqkJKhNBHKKqmHhwkapgG6KpURUM

Before continuing, verify the record is deployed.
- - - - - - - - - - - - - - - - - - - - - - - - - - - - - - - - - - - - - - - -
Press Enter to Continue

이제 엔터를 누르면 안 됩니다!! 또 위와 같은 메시지가 나옵니다. 하나는 *.hyunsub.kim 에 대한 것이고, 나머지 하나는 hyunsub.kim 에 대한 것입니다. 
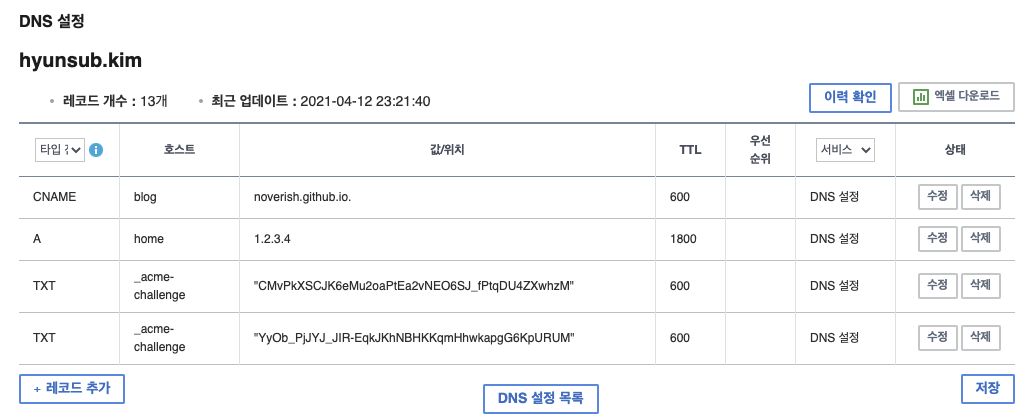
각각의 두 문자열을 본인이 사용하고 있는 DNS 제공 업체의 관리툴에 가서 TXT 타입으로 등록해줍니다. 저는 가비아를 사용하고 있기 때문에 아래와 같이 설정해주었습니다.

가비아 DNS 설정 스크린샷

해당 내용이 DNS 서버에 반영되기까지 시간이 걸리기 때문에 바로 엔터를 누르면 안 됩니다!!!

아래와 같이 dig 명령어를 사용하여 정상적으로 두 문자열이 잘 뜰 때까지 기다립니다.

1
2
3
4
5
6
7
8
9
10
11
12
13
14
15
16
17
18
19
20
21
$ dig _acme-challenge.hyunsub.kim txt

; <<>> DiG 9.10.6 <<>> _acme-challenge.hyunsub.kim txt
;; global options: +cmd
;; Got answer:
;; ->>HEADER<<- opcode: QUERY, status: NOERROR, id: 41154
;; flags: qr rd ra; QUERY: 1, ANSWER: 1, AUTHORITY: 0, ADDITIONAL: 1

;; OPT PSEUDOSECTION:
; EDNS: version: 0, flags:; udp: 4096
;; QUESTION SECTION:
;_acme-challenge.hyunsub.kim. IN TXT

;; ANSWER SECTION:
_acme-challenge.hyunsub.kim. 600 IN TXT "CMvPkXSCJK6eMu2oaPtEa2vNEO6SJ_fPtqDU4ZXwhzM"
_acme-challenge.hyunsub.kim. 600 IN TXT "YyOb_PjJYJ_JIR-EqkJKhNBHKKqmHhwkapgG6KpURUM"

;; Query time: 130 msec
;; SERVER: 210.220.163.82#53(210.220.163.82)
;; WHEN: Thu Jul 08 19:29:30 KST 2021
;; MSG SIZE rcvd: 112

위와 같이 ANSWER SECTION에 두 문자열이 잘 뜨면 작업을 진행하던 터미널에 엔터를 누릅니다.

1
2
3
4
5
6
7
8
9
10
11
12
13
14
15
16
Waiting for verification...
Cleaning up challenges

IMPORTANT NOTES:
- Congratulations! Your certificate and chain have been saved at:
/etc/letsencrypt/live/hyunsub.kim/fullchain.pem
Your key file has been saved at:
/etc/letsencrypt/live/hyunsub.kim/privkey.pem
Your cert will expire on 2021-07-11. To obtain a new or tweaked
version of this certificate in the future, simply run certbot
again. To non-interactively renew *all* of your certificates, run
"certbot renew"
- If you like Certbot, please consider supporting our work by:

Donating to ISRG / Let's Encrypt: https://letsencrypt.org/donate
Donating to EFF: https://eff.org/donate-le

그러면 위와 같이 뜨면서 와일드카드 인증서 발급이 완료되었습니다!

인증서 갱신

인증서 갱신할 때는 인증서 발급할 때와 같은 명령어를 입력하면 됩니다. Certbot이 알아서 처리해줍니다.

8. [부록] 사설 인증서 만들기

1
2
3
4
5
6
7
8
9
10
11
12
13
14
15
16
17
18
19
20
21
$ openssl req -x509 -nodes -days 365 -newkey rsa:2048 -keyout selfsigned.key -out selfsigned.crt

Generating a RSA private key
.......+++++
.....................................................................................................+++++
writing new private key to 'selfsigned.key'
-----
You are about to be asked to enter information that will be incorporated
into your certificate request.
What you are about to enter is what is called a Distinguished Name or a DN.
There are quite a few fields but you can leave some blank
For some fields there will be a default value,
If you enter '.', the field will be left blank.
-----
Country Name (2 letter code) [AU]:KR
State or Province Name (full name) [Some-State]:Seoul
Locality Name (eg, city) []:Seoul
Organization Name (eg, company) [Internet Widgits Pty Ltd]:Hyunsub
Organizational Unit Name (eg, section) []:Hyunsub
Common Name (e.g. server FQDN or YOUR name) []:home.hyunsub.kim
Email Address []:embrapers263@gmail.com

여기서 생성된 selfsigned.crt는 인증서, selfsigned.key는 개인 키입니다.

내 서버에 Https 적용하기 (with Nginx)

https://blog.hyunsub.kim/Server/HTTPS/

Author

Hyunsub Kim

Posted on

2020-03-10

Licensed under

댓글